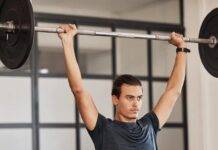


















Усі женуться за біцепсом. Це «м’яз для краси». Але ігнорувати трицепс – тактична помилка. Трицепс складає дві третини вашої руки. Пропустіть його, і ви пропустите обсяг та стабільність. Вам потрібний збалансований підхід. Цей посібник розкриває механіку тренування трицепса, починаючи з основ. Ми розглянемо розгинання, жими та французькі жими (кікбеки). Ви побачите, як використовувати еластичні стрічки, ваги та власну вагу. Мета – функціональна сила, а не лише естетика.
Налаштування для розгинання з гумовим еспандером
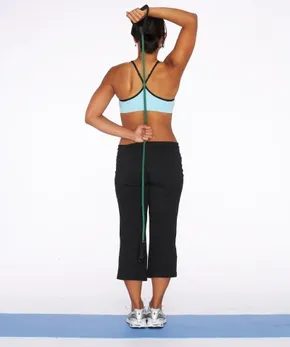
Візьміть гумовий еспандер. Його можна купити у більшості спортивних магазинів. Це просте обладнання. Для нього не потрібний абонемент у тренажерний зал.
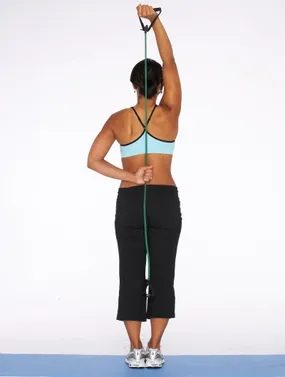
Правильно розташуйте руки. Візьміть один кінець стрічки однією рукою. Схопіть середину стрічки іншою рукою. Тримайте поставу стійкою. Саме ця напруга створює м’яз.
Чому трицепс важливіше, ніж ви думаєте
Трицепс – це не просто “задня частина руки”. Це основний м’яз, що рухає руку при рухах, що штовхають. Віджимання. Жим лежачи. Жим над головою. Якщо ваші трицепси слабкі, страждає сила поштовху верхньої частини тіла. Це впливає на все: від підйому продуктів до спортивних результатів.
Більшість людей фокусується на ізоляції. Вони хочуть «підковування». Але базові вправи будують реальну силу. Ізоляційні вправи підганяють форму. Вам потрібні обидва типи.
Покроково: Розгинання трицепса над головою з еспандером
Ця вправа орієнтована на довгу головку трицепса. Саме ця частина м’яза надає об’єму руці.
- Встаньте прямо. Ноги на ширині плечей.
- Візьміться за стрічку. Одна рука зверху. Одна рука посередині.
- Підніміть робочу руку. Тримайте лікоть близько до голови. Направте його вгору.
- Розігніть. Виштовхуйте стрічку вгору, доки рука не випрямиться.
- Опускайте повільно. Відчуйте розтягнення на задній стороні руки.
- Повторіть. Прагніть контрольованих повторень. Не до швидких ривків.
Контроль – ключ до успіху. Інерція вбиває прогрес. Якщо ви розгойдуєте стрічку, ви використовуєте плечі, а не трицепси. Уповільніться. Ексцентрична фаза – фаза опускання – будує більше м’язів, ніж підйом.
Інші варіанти навантаження
Еспандери чудово підходять для домашніх тренувань. Але різноманітність має значення. Гантелі забезпечують різні кути навантаження. Вправи із власною вагою взагалі не вимагають обладнання.
- ** Кікбеки з гантеллю: ** Нахилиться вперед. Витягніть руку назад. Стискайте м’яз у верхній точці.
- Віджимання на брусах (або від лави): Використовуйте стілець або лаву. Опускайте тіло. Вижимайте назад.
- Жим гантелі над головою: Працює трицепс як синергіст. Розвиває загальну стабільність плечового суглоба.
Поширені помилки, яких слід уникати
Виведення ліктів убік – поширена помилка. Тримайте лікті притиснутими. Це захищає суглоби. Це також ізолює трицепс.
Не блокуйте суглоби надто сильно у верхній точці. Зберігайте напругу. М’яз ніколи не відпочиває. Ця постійна напруга призводить до кращого зростання.
Підсумок
Сильні трицепси означають сильні руки. Вони означають найкращу силу поштовху. Вони означають збалансовану фігуру. Почніть з розгинання з еспандером. Освойте техніку. Потім додайте вагу. Додайте різноманітність. Ваші руки будуть вам вдячні.
Що відбувається
Механіка статичного розгинання ліктя
Стабільність – це непорушний фундамент. Як тільки ваша рука притиснута до краю, лікоть має діяти як нерухомий шарнір. Він не зміщується вперед. Чи не відводиться назад. Він залишається зафіксованим у просторі. Рух відбувається виключно в променево-зап’ястковому суглобі та передпліччі.
Коли ви випрямляєте руку над головою, ви розтягуєте трицепс. Це точка максимального розтягування м’яза. Утримання ліктя нерухомим змушує трицепс виконувати всю роботу. Якщо лікоть рухається, навантаження переноситься на плечі чи спину. Це зводить нанівець мету ізоляції м’яза.
Стиснення в точці максимальної контракції
У верхній точці розгинання час ніби завмирає. Не дозволяйте гравітації миттєво опустити руку вниз. Утримуйте положення. Сильно стисніть задню частину руки. Ви повинні відчути, як трицепс випирає та напружується під шкірою. Це пікова контракція. Момент максимальної напруги.
Навіщо тримати? Тому що час під навантаженням розвиває чинність. Це також гарантує, що ви дійсно працюєте трицепсом, а не просто розгойдуєте вагу. Слабке стиснення означає слабке залучення м’яза. Робіть це свідомо.
Зв’язуємо воєдино: техніка з гумовою стрічкою
Ті ж принципи використовуються, коли ви переходите на використання гумової стрічки. Механіка залишається ідентичною. Притисніть лікоть до бока. Повністю випряміть руку. Стисніть у верхній точці. Різниця полягає у профілі опору. Гумові стрічки забезпечують зростаючий натяг у міру їх розтягування. Чим сильніше ви тиснете, тим більше опору зустрічаєте. Це прогресивне навантаження у часі.
Але будьте обережні. Стрічки можуть різко відпружити. Контролюйте ексцентричну фазу. Опускайте вагу повільно. Не дозволяйте йому вільно падати. Фаза опускання важлива для зростання м’язів, як і фаза підйому.
Розширення вашого арсеналу
Ця вправа – інструмент. Не весь ящик із інструментами. Вам потрібна варіативність для формування збалансованої статури. Якщо ви шукаєте інші способи зміцнити руки чи все тіло, існують інші шляхи.
- Комплексне тренування для всього тіла : Для загальної сили та координації.
- Силові тренування для жінок : Спеціалізовані підходи до нарощування м’язової маси без зайвого обсягу.
- Розминальні вправи : Необхідна підготовка для запобігання травмам перед важким тренуванням.
- Вправи для преса : Стабільність кори підтримує кожен рух верхньої частини тіла.
- Вправи для рук, грудей і плечей : Базові рухи, що зачіпають кілька груп м’язів.
- Розтяжка : Підтримка та робота над мобільністю, які зберігають м’язи еластичними.
Кожна з них служить своїй меті. Деякі збільшують масу. Деякі покращують витривалість. Дехто захищає від травм. Вибирайте те, що потрібно вашому тілу зараз. Не просто копіюйте чужі програми. Прислухайтеся до своїх м’язів. Вони здаються напруженими? Вільними? Слабкими? Сильними? Коригуйте навантаження відповідно.
Чому важлива специфічність
Ви можете поставити запитання, чому ми так багато уваги приділяємо одній невеликій групі м’язів. Трицепс складає дві третини обсягу вашої руки. Ігнорування його означає втрачений потенціал щодо розміру. Вони також допомагають у рухах руху. Віджимання. Жим лежачи. Жим над головою. Слабкі трицепси означають слабкий жим.
Ізоляція трицепса за допомогою розгинання через голову або з використанням гумової стрічки дозволяє безпосередньо впливати на цю слабкість. Не про марнославство. Мова про функціональність. Сильний трицепс допомагає вам відкрити двері. Допомагає підняти дитину. Допомагає підтримувати поставу.
Але не пере
Управління напругою
Секрет максимальної ефективності розгинання трицепса з гумовою стрічкою полягає не у швидкому русі. Важливо рухатись під контролем. Швидкість тут убиває напругу. Ви повинні відчувати печіння в задній частині руки, а не просто махати вагою.
Закріплення точки опори
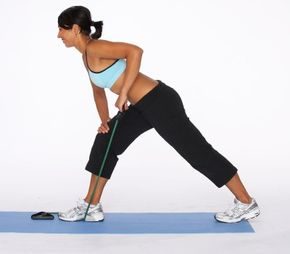
Почніть із правильної постановки ніг. Покладіть гумову стрічку під праву ногу. Це зафіксує снаряд. Злегка нахиліться вперед, зберігаючи спину прямою, і обіпріться правою рукою на праве стегно для стійкості. Ваше тулуб має бути паралельно підлозі або трохи нижче, залежно від вашої гнучкості.
Позиціювання робочої руки
Тепер візьміть ліву руку за інший кінець стрічки. Підніміть ліву руку так, щоб вона була майже паралельна підлозі. Лікоть має бути притиснутий до боку і спрямований строго назад. Це ваше вихідне становище. Плечо залишається нерухомим. Якщо воно зміщується вгору або вниз, ви вмикаєте плечі замість ізоляції трицепса. Досягніть правильного вирівнювання, перш ніж думати про розгинання руки.
Стабілізуйте основу
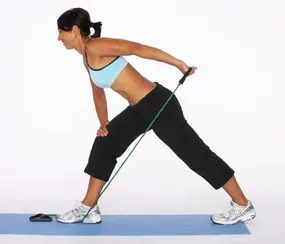
Зафіксуйте лікоть. Уявіть, що він «приварений» до вашого боку. Якщо лікоть йде убік, напруга йде з трицепса і переноситься на плечовий суглоб. Це не наша ціль. Тримайте суглоб нерухомим. Він повинен залишатися статичним, поки решта тіла рухається.
Поштовх і випрямлення
Тепер різко, але контрольовано відведіть ліву руку назад. Ви створюєте місце. Медбол рухається назад від тіла. Не дозволяйте інерції вводити весь корпус вперед. Залишайтеся на місці.
Потім слід стиснення. Сильно скоротить трицепс. Повністю випряміть руку. Витягніть її до повного блокування в лікті. Саме там виникає печіння. Працює м’яз, а чи не інерція руху.
Чому це важливо
Більшість людей пропускають етап стабілізації. Вони хочуть, щоб вага рухалася швидко. Але швидкість без контролю спричиняє травми ротаторної манжети. Трицепсовий жимовий рух із медболом — це не про те, наскільки важкий м’яч. Це про те, наскільки ізольованим відчувається рух.
Якщо ви хочете розвинути не тільки об’єм рук, спробуйте:
- Тренування на все тіло : Для загальної фізичної підготовки.
- Силові тренування для жінок : Основи силових тренувань.
- Розминка : Підготовка суглобів перед навантаженням.
- Вправи на прес : Стабільність кори підтримує силу верхньої частини тіла.
- Вправи для рук, грудей та плечей : Базові вправи для набору маси.
- Розтяжка : Підтримка діапазону рухів.
Медбол додає елемент нестабільності. Це змушує включатися дрібні м’язи, що стабілізують. Ви не просто штовхаєте. Ви балансуєте. Ця тонка відмінність змінює результат.
Освоєння нестабільного жиму трицепсів
Фітболи відмінно підходять для активації м’язів кора, але вони додають змінну, якої немає у більшості тренажерів у залі: постійну нестабільність. Це перетворює стандартне розгинання трицепсів на завдання на координацію. Медбол додає навантаження, але м’яч під вашим тілом змушує м’язи-стабілізатори працювати на межі, щоб просто утримувати вас у вертикальному положенні.
Основний ризик тут полягає не у вазі. Він у положенні тіла. Якщо ваша голова зісковзне або шия викривиться, ви перестанете тренувати трицепси. Ви ризикуєте отримати травму шийного відділу.
Спочатку забезпечте фіксацію голови та шиї
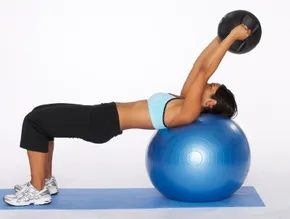
Перед тим, як піднімати медбол, перевірте свою підготовку. Ляжте спиною на фітбол. Ваш хребет повинен спиратися на його вигин, але ключовими точками контакту є голова та плечі.
Ваша голова, шия та плечі повинні залишатися щільно притиснутими до м’яча протягом усього руху.
Якщо голова відривається від м’яча, навантаження лягає на шию. Це швидкий шлях травми. Тримайте підборіддя трохи притиснутим до грудей. Зберігайте цей контакт. Якщо відчуваєте, що рівновага порушується, зупиніться. Скиньте напругу та почніть заново. Не дозволяйте техніці погіршуватися через втому.
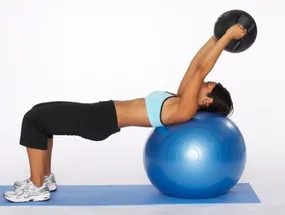
Крок 3
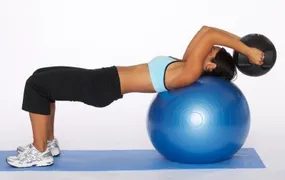
Зафіксуйте верхню частину рук. Не дозволяйте їм зміщуватися вперед або назад. Згинайте лише лікті. Опустіть медичний м’яч за голову до тих пір, поки передпліччя не торкнуться біцепсів.
Крок 4
Натисніть на м’яч назад вгору. Повністю випряміть руки. У верхній точці сильно напружте трицепси. Саме у цьому скороченні м’яз виконує основну роботу.
Щоб дізнатися більше відмінних вправ для покращення сили та фізичної форми, ознайомтеся з:
- Комплексним тренуванням для всього тіла
- Підйомом ваг для жінок
- розминочними вправами
- Вправами для преса
- Вправами для рук, грудей та плечей
- вправами на розтяжку
Як виконувати жим трицепса з гантелями
Версія з гантелями слідує тій же логіці, але змінює важіль. Ви тримаєте одну гантель двома руками. Тримайте її вертикально біля грудей.
Підніміть її над головою. Тримайте корпус напруженим. Хребет повинен залишатися у нейтральному положенні. Повільно опускайте вагу. Відчуйте розтягнення довгої голівки трицепса.
Видавте гантель назад вгору. Не блокуйте лікті у верхній точці. Підтримуйте напругу у м’язі. Це захищає суглоб.
Це простий рух. Але воно створює серйозну щільність м’язів. Спробуйте виконати його після тренування грудей. Або зробіть його основним елементом тренування рук.
Що працює краще? Медичний м’яч чи гантель? М’яч додає нестабільності. Гантель додає точну вагу. Обидва варіанти змушують трицепс стабілізувати становище. Це додатковий плюс.
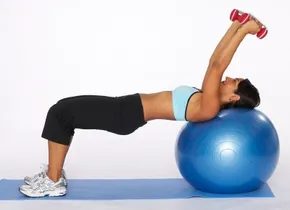
Налаштування для жиму трицепсів на фітболі
Більшість людей представляють жим трицепс як вправу, що виконується лежачи на лаві або стоячи. Це лише половина історії. Існує безліч способів опрацювати м’язи задньої поверхні руки, але використання двох гантелей та фітболу повністю змінює справу. Йдеться як про рух рук; нестабільність змушує ваші м’язи кора працювати інтенсивніше.
Щоб отримати максимальну користь від цієї варіації, потрібне правильне положення. Спочатку візьміть гантелі. Потім займіть позицію на м’ячі. Ви повинні лягти спиною так, щоб вигин м’яча підтримував хребет. Це потрібно не лише для комфорту. Мета – створити стабільну, але динамічну платформу.
Заняття вихідного положення
Почніть з того, що ляжте на фітбол. Якщо ви виконуєте місток, ваші стегна повинні бути щільно притиснуті до м’яча; для більшої стійкості можна залишити стопи на підлозі, залежно від конкретної варіації вправи. Головна мета тут – контроль.
Переконайтеся, що ваша голова, шия та плечі повністю підтримуються м’ячем. Якщо голова звисає з краю, ви ризикуєте шийний відділ хребта. Це швидкий спосіб достроково завершити тренування. Вирівняйте плечі на поверхні м’яча. Шия повинна знаходитися в нейтральному положенні, погляд спрямований у стелю або прямо перед собою, а не закинутий назад.
Правильне вирівнювання є обов’язковим. Якщо шия відчуває напругу, вашу техніку порушено.
Коли верхня частина тіла займе правильне положення, плечі повинні відчуватись розслабленими, але включеними в роботу. Ця поза забезпечує більшу амплітуду рухів, ніж плоскій лаві. Вона також перевіряє ваш баланс. Якщо вас хитає, напружте м’язи кори. Не дозволяйте нестабільності диктувати вашу техніку. Спочатку забезпечте надійну підтримку і лише після цього піднімайте ваги.
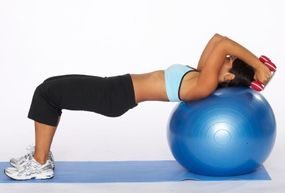
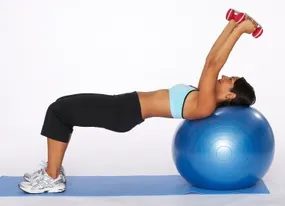
Трицепсовий жимовий рух зі штангою: механіка
Ваші верхні частини рук мають залишатися зафіксованими. Це незаперечна умова для ізоляції цільового м’яза. Згинайте лише лікті. Опускайте гантелі доти, доки вони не опиняться за головою. Тримайте рух під контролем. Не дозволяйте гравітації виконувати роботу за вас.
Потім випряміть руки. Повністю розігніть їх над головою. Саме в цей момент відбувається скорочення трицепса. Стисніть м’язи у верхній точці. Затримайтеся на секунду. Потім виконайте зворотний рух із тією ж цілеспрямованою плавністю.
Ціль тут не просто в переміщенні ваги. Це розвиток сили та фізичної форми через точність. Якщо ви хочете розширити свою тренувальну програму за межі цієї конкретної вправи, існують інші перевірені шляхи.
Розширення тренувальної програми
Вам не потрібно винаходити велосипеда, щоб побачити результати. Вам потрібна лише послідовність у виконанні основних рухових патернів. Ось напрямки, які варто вивчити:
- Тренування всього тіла: Для тих, хто хоче комплексний підхід, що стосується всіх основних груп м’язів за меншу кількість тренувань.
- Силові тренування для жінок: Керівництво, адаптоване під різні фізіологічні реакції та силові цілі, специфічні для жінок-атлетів.
- Розминка: Часто пропускається, але необхідна для запобігання травмам та підготовці нервової системи до важких навантажень.
- Вправи на прес: Стабільність кора підтримує будь-яку іншу вправу, від присідань до жимов.
- Вправи для рук, грудей та плечей: Оскільки ви працюєте з трицепсом, логічно збалансувати навантаження вправами для біцепса та плечей для естетичної симетрії.
- Розтяжка: Мобілізаційна робота після тренування допомагає підтримувати амплітуду рухів із часом.
Як виконувати трицепсовий жимовий рух зі штангою
Варіант з гантелями гарний, але трицепсовий рух жиму зі штангою забезпечує інший стимул. Воно дозволяє використовувати більшу вагу та більш фіксовану траєкторію руху.
Почніть з лежання на лаві. Візьміться за штангу хватом трохи вже ширини плечей. Цей вужчий хват більше акцентує увагу на довгій головці трицепса. Зніміть вагу зі стояків і повністю випряміть руки над грудьми. Ваші лікті повинні бути спрямовані в стелю, а не розведені убік.
Повільно опустіть штангу. Опустіть її до чола або трохи позаду голови. Тримайте лікті притиснутими. Якщо вони розійдуться убік, ви перенесете напругу на плечі. Як тільки штанга торкнеться (або торкнеться) голови, натисніть назад у вихідне положення.
Видихайте при поштовху. Вдихайте при опусканні.
Чому варто перейти на штангу? Вона потребує стабільності. З гантелями вашим зап’ястям доводиться важче працювати для стабілізації ваги. Зі штангою зап’ястя зафіксовано. Це дозволяє піднімати більшу вагу, що сприяє зростанню сили. Але це також означає менше місця для помилок. Техніка може порушитись швидше.
Звертайте увагу на свої лікті. Вони є шарнірами цього руху. Якщо вони зміщуються, трицепси беруть він меншу навантаження. Плечі беруть на себе більше. Цього ми не хочемо. Ми хочемо, щоб трицепси виконували основну роботу.
Ця вправа вписується у будь-яку спліт-програму для верхньої частини тіла. Воно є класикою не так. Воно розвиває м’язову масу задньої поверхні рук. Воно підтримує рухи жиму, такі як жим лежачи і жим над головою. Без сильних трицепсів ваша стеля в жимових вправах обмежена.
Нема чарівного діапазону повторень. Для гіпертрофії дотримуйтесь 8-12 повторень. Для розвитку сили використовуйте більшу вагу.
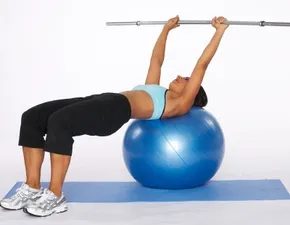
Як виконувати жим трицепсів на фітболі для зміцнення м’язів кора
Більшість людей приділяють задній поверхні рук другорядну увагу. Трицепси складають близько двох третин маси верхньої частини руки. Ігнорування цих м’язів залишає фігуру незавершеною. Ви можете ефективно опрацювати ці м’язи, використовуючи стандартний гриф, але додавання фітболу змінює справу. Це змушує м’язи кора постійно вмикатися для підтримки балансу. Це вже не просто ізолююча вправа. Це комплексне завдання на стабільність та силу.
Налаштування на фітболі
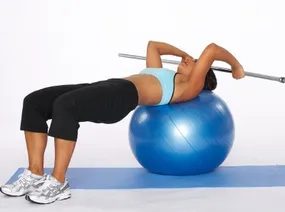
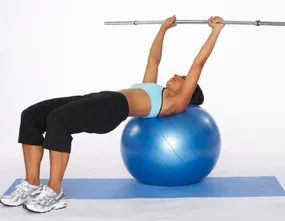
Основою цієї вправи є стабільність. Ви повинні лягти на м’яч так, щоб голова, шия та плечі були повністю підтримані. Якщо хребет згинається неприродно або напружується шия, ви робите це неправильно. М’яч має комфортно підтримувати верхню частину спини. Поперек має залишатися в нейтральному положенні, не провалюючись у вигин м’яча.
Виконання руху
Коли ви зручно влаштувалися, візьміть гриф. Тримайте лікті близько до боків. Це ізолює трицепси, не дозволяючи плечима брати на себе основне навантаження. Витисніть гриф догори, поки руки майже не випрямляться. Повільно опустіть його назад до обличчя. Контролюйте вагу. Не дозволяйте йому падати. М’язи живота та попереку повинні залишатися напруженими протягом усього повторення. Якщо таз провисає або м’яч занадто сильно хитається, ви втрачаєте це включення м’язів кори.
Чому варто вибрати цю варіацію замість жиму на горизонтальній лаві? Нестабільна поверхня використовує більше м’язових волокон. Тілу доводиться працювати старанніше, щоб зберегти рівновагу. Це додає рівень функціональної сили, який може відтворити стабільна лава. Це розумніший спосіб тренувати трицепси, якщо ви хочете отримати більше, ніж просто великі руки.
Виконання руху
Як тільки ваша техніка встановлена, починається справжня робота. Тримайте верхні частини рук нерухомо. Подайте їх як статичні опори. Не дозволяйте їм зміщуватися вперед або назад.
Згинайте лікті. Опускайте гантелі за голову. Ви повинні відчути розтяг трицепсів. Вага рухається вниз, від плечей. У цій вправі працюють передпліччя, а не біцепси.
Потім виконайте зворотний рух. Повністю випряміть руки. Витягніть їх, поки вони не стануть паралельними підлозі або злегка відхиленими назад. У верхній точці сильно скоротить трицепси. Стисніть м’яз. Саме тут напруга сягає піку.
Контролюйте опускання ваги. Не дозволяйте гравітації опускати снаряди. Ексцентрична фаза так само важлива, як і концентрична (підйом).
Чому ця вправа важлива
Люди часто запитують, яка вправа на трицепси дає найкращі результати збільшення маси. Відповідь не така проста. Але розгинання рук із гантеллю з-за голови впливає на всі три головки триголового м’яза плеча. Довга головка особливо активно вмикається, коли рука піднята. Це відрізняє його від розгинання на блоці або жимов вузьким хватом.
Воно збільшує масу. Воно формує задню поверхню руки. І воно покращує силу у рухах жита над головою. Саме тому воно заслуговує на місце у вашій тренувальній програмі.
Поширені помилки, яких слід уникати
Багато спортсменів псують цей рух, переміщуючи лікті. Тримайте їх спрямованими в стелю. Якщо вони розлучаються убік, ви втрачаєте напругу. Ви також ризикуєте отримати імпінджмент-синдром плеча.
Інша помилка – використання занадто великої ваги. Трицепси – це невеликі м’язи. Вони втомлюються швидше, ніж грудні чи плечові м’язи. Використовуйте вагу, яка дозволяє виконати повне випрямлення рук. Якщо ви не можете контролювати положення в нижній точці, вага занадто велика.
«Ізолюючі вправи, такі як це, не про підйом его. Вони про те, щоб відчувати роботу цільового м’яза».
Де розмістити його в тренувальній програмі
Ви можете виконувати його як ізолюючу вправу наприкінці тренування. Або використовувати його на початку сесії, якщо трицепси є слабким місцем. Воно добре поєднується із базовими вправами. Спробуйте виконувати його після жиму лежачи. Або увімкніть його в суперсет зі згинаннями рук на біцепс. Це підтримує високий кровотік та економить час.
Для комплексного підходу до сили розгляньте, як це вписується у ширші цілі. Тренувальна програма для тіла часто виграє від збалансованого тренування рук. Силові тренування для жінок, чоловіків або будь-якої іншої людини потребують послідовності. Розминальні вправи готують суглоби. Вправи на прес підтримують стабільність кори. Вправи для рук, грудей та плечей працюють у зв’язці. Розтяг забезпечує довгостроковий результат.
Трицепси становлять дві третини об’єму руки. Ігнорувати їх означає упускати потенціал для зростання. Але так само, як і ігнорувати відновлення. Так само, як і ігнорувати техніку.
Починайте з легкої ваги. Знайдіть розтяг. Скорочуйте м’яз сильно. Повторюйте.
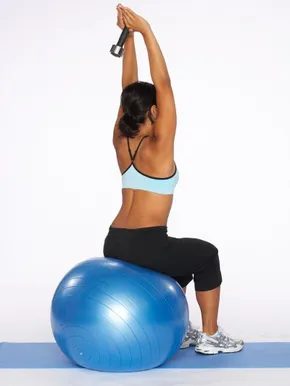
Можливо, вам здається, що швидке виконання повторень це найшвидший шлях до підтягнутих рук. Це негаразд. Це пастка.
Коли йдеться про вправу «розгинання рук із гантеллю через голову», інерція — ваш ворог. Ви не будуєте м’язи, проходячи через підхід на швидкості. Ви просто переміщаєте вагу з точки А до точки Б. Справжній прогрес відбувається за рахунок контролю. Зокрема, за рахунок повільного та усвідомленого опускання ваги.
Гравітація робить половину роботи, якщо ви виконуєте вправу недбало. Це не тренування. Це просто дозволу фізиці нести навантаження. Щоб по-справжньому відчути печіння, ви повинні змусити кожне дюйм руху мати значення.
Закладаємо основу
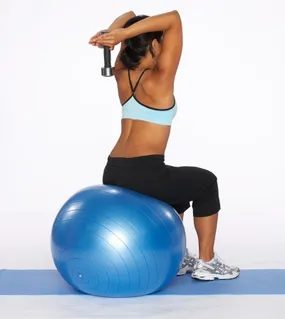
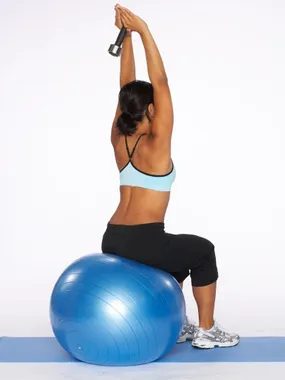
Почніть із сидіння на фітболі. Нестабільність тут навмисна. Вона змушує ваше ядро (прес та м’язи спини) включатися в роботу, зберігаючи хребет у нейтральному положенні. Якщо ви сутулитесь, ви ризикуєте отримати травму попереку, а не проробляєте руки.
Візьміть одну гантель обома руками. Підніміть її прямо над головою. Ваші лікті повинні дивитися в стелю, а не розвертатися убік. Тримайте верхню частину рук нерухомою. Вони є точкою обертання. Рухатися мають лише передпліччя.
Контроль – це метрика. Швидкість – ворог.
Спочатку вага має здаватися легкою. Це тому, що ви не закидатимете його вгору і вниз. Ви опускатимете його за голову з болісною повільністю. Потім знову підніміть його.
Саме так ви ізольовано проробляєте довгу головку трицепса. Саме тут формується форма. Не за рахунок ривків та швидких повторень, які обманюють амплітуду руху. А за рахунок напруги під навантаженням.
Підготовка
Тримайте корпус нахиленим уперед, зберігаючи нейтральне положення хребта. Мета полягає не просто в переміщенні ваги, а в ізоляції цільового м’яза при одночасному захисті попереку. Поставте ноги на ширині плечей. Візьміть у руки гантелі. Напружте м’язи кора. Це стабілізує таз та запобігає гіперекстензії поперекового відділу, яка псує техніку ще до початку першого повторення.
Крок 1
Нахилиться в кульшових суглобах. Подайте корпус вперед до положення, майже паралельного підлозі. Або трохи менше, якщо у вас напружені біцепси стегна. Головне – тримати спину прямою. Чи не округленою. Чи не прогнутою. Просто прямий. Нехай руки звисають перед вами.
Крок 2
Зігніть лікті. Підніміть гантелі до грудної клітки. Плечі повинні залишатися притиснутими до боків. Якщо лікті розлучаються убік, ви переносите навантаження на передні дельтоподібні м’язи. Тримайте їх притиснутими. У результаті гантелі повинні бути tucked під пахвами. Це вихідне становище. Затримайтеся тут. Відчуваєте розтяг у трицепсі? Чудово.
Крок 3
Видавіть гантелі прямо назад. Розігніть лікті до повного випрямлення рук. Не до перерозгинання. Просто до прямого становища. Уявіть, що ви проштовхуєте гантелі крізь стіну позаду вас. Сильно стисніть задню поверхню рук у верхній точці. Затримайтеся на секунду. Потім контрольовано опустіть їх у положення зі зігнутими ліктями. Не дозволяйте гравітації виконувати роботу на опусканні. Опирайтеся вазі.
«Рух повільний на опусканні, швидкий на підйомі. Або точніше: вибухове вгору, яке контролюється вниз.»
Чому це важливо
Розгинання рук на трицепс – це одностороння (унітарна) вправа. Це означає, що ви працюєте однією рукою за один раз. Це допомагає виявити дисбаланс сили. Якщо ліва рука видається слабшою, ви це помітите. Це також чистий ізолюючий рух. На відміну від жиму лежачи вузьким хватом, в якому беруть участь грудні та плечові м’язи, розгинання націлене на довгу, латеральну та медіальну головки трицепса за мінімальної участі інших м’язових груп.
Типові помилки
Багато людей розгойдують вагу. Вони використовують інерцію. Це контрпродуктивно. Якщо вам доводиться розгойдувати гантель вперед, щоб повернути її у вихідне положення, вага занадто велика. Зменшіть вагу. Візьміть легші гантелі. Зосередьтеся на зв’язку «мозок-м’яз».
Інша помилка – обертання зап’ясть. Тримайте долоні, звернені один до одного протягом усього руху. Нейтральний хват. Це зберігає навантаження на трицепсі, а не на ліктьовому суглобі.
Прогресивне навантаження
Починайте з малої ваги. Освойте техніку. Як тільки зможете виконати 12–15 повторень із ідеальною технікою, збільште вагу. Невеликівиміри. один кілограм. Два кілограми. Не поспішайте. Трицепс – це невеликий м’яз. Вона добре відгукується на великий об’єм та точну техніку, а не лише на важкі ваги.
Допоміжні вправи
Потрібно більше різноманітності? Спробуйте розгинання рук із гантеллю через голову. Воно спрямоване саме на довгу голівку. Або розгинання на блоці. Воно відмінно підходить для пампінгу. Але розгинання із гантелями залишається класикою не просто так. Воно розвиває стабільність та силу у функціональному положенні.
Щоб дізнатися більше про ефективні вправи для покращення сили та фізичної форми, ознайомтеся з:
- Комплексне тренування на все тіло
Освоєння розгинання рук на трицепс з м’ячем для фітнесу
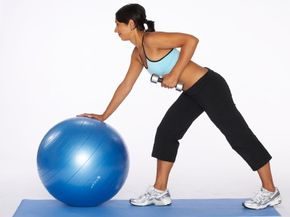
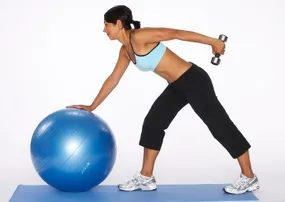
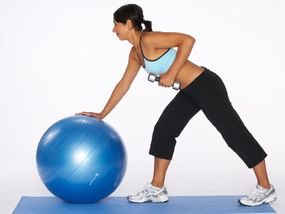
Розгинання рук на трицепс (kickback) є класичною вправою не просто так, але заміна лави на фітбол додає рівень нестабільності, що змушує м’язи кори працювати з подвоєною силою. Ви не просто ізольовано проробляєте задню поверхню плеча, але й балансуєте на поверхні, що хитається однією рукою, одночасно піднімаючи вагу. Ця оманлива проста вправа впливає на довгу, латеральну та медіальну головки трицепса без необхідності використання фіксованої лави.
Вихідне положення
Спочатку щільно зафіксуйте праву руку на фітбол. Це ваша опора. Тут важливе правильне положення ніг. Злегка зігніть праве коліно, щоб опустити центр тяжіння, а ліву ногу витягніть назад. Ця ступінчаста стійка створює стійку базу, незважаючи на нестабільність м’яча. Тримайте спину прямий, напружуючи м’язи преса, щоб запобігти розгойдування стегон.
Виконання руху
Візьміть гантель лівою рукою. Зробіть нахил вперед у кульшовому суглобі так, щоб ваш тулуб виявився майже паралельно підлозі. Верхня частина руки має щільно прилягати до грудної клітки. Тепер підніміть ліву руку в ліктьовому суглобі так, щоб вона стала паралельна підлозі. Це ваше вихідне становище. Не дозволяйте ліктю опускатися. Тримайте його притиснутим до краю. Рух відбувається лише у ліктьовому суглобі. Розігніть передпліччя назад до повного випрямлення руки, сильно напружуючи трицепс у верхній точці. Затримайтеся на секунду. Потім повільно та підконтрольно опустіть руку назад.
Чому це ефективно
Використання фітболу збільшує навантаження на м’язи-стабілізатори. Тут не можна просто механічно повторювати рухи. Ваші косі м’язи живота та нижня частина спини повинні постійно працювати, щоб утримувати тіло у вертикальному положенні. Це додає функціональної сили до базової ізолюючої вправи. Йдеться не лише про збільшення об’єму рук. Йдеться про контроль.
Поширені помилки
Люди часто прогинають поперек, коли втомлюються. Зупиніться. Скиньте напругу та почніть заново. Якщо ви не можете тримати спину прямою, зменшіть вагу. Гойдання гантелі з допомогою інерції — використання імпульсу, а чи не м’язів. Це обман. Тримайте верхню частину руки нерухомою. Рухається лише передпліччя. Уявляйте, що ви тягнетесь рукою назад, а не відштовхуєте вагу від себе.
Висновок
Це не найпростіша вправа. М’яч кататиметься, м’язи кора горітимуть. Але в цьому і є суть. Вправа розвиває стабільність. Воно розвиває чинність. Воно формує руки, які справді добре виглядають з усіх ракурсів. Спробуйте його наступного разу, коли тренуватимете трицепс. Спробуйте утримувати верхню точку положення протягом двох секунд. Відчуття печіння справжнє. І результати будуть такими самими.
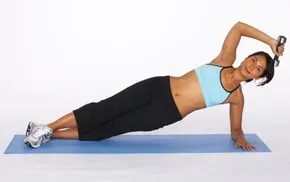
Бічна планка з розгинанням трицепса
Ви утримуєте позицію. Тепер розпочинається справжня робота.
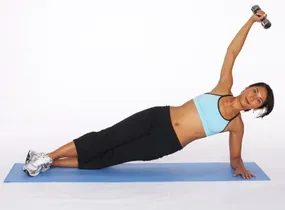
Випряміть ліву руку. Повністю витягніть її вгору, до стелі. Роблячи це, напружте м’яз трицепса. Відчуйте, як зростає напруга в задній частині верхньої частини руки. Йдеться не просто про нерухомість. Йдеться про активне включення м’язів. Трицепс повинен працювати, щоб утримувати руку нерухомо проти сили тяжіння.
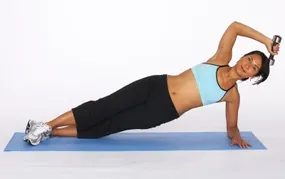
Поверніться у вихідне положення. Зігніть лікоть, поки ваша рука не виявиться поруч із вухом, на ширині плечей. Опускайте руку повільно. Контролюйте рух униз. Не дозволяйте силі тяжкості перемогти.
Ця вправа задіє як м’язи кора. Це комплексне зусилля. Косі м’язи живота стабілізують хребет. Сідниці утримують таз піднятим. А трицепс? Він керує навантаженням витягнутої руки. Це ефективно. Висока результативність за витраченого часу.
Чому ця варіація важлива
Більшість людей сприймають бічну планку як статичне утримання. Вони просто терплять. Але додавання розгинання трицепсу змінює справу.
Воно вносить нестабільність. Тіло має коригувати усунення розподілу ваги. Це привертає до роботи більше м’язових волокон. Це розвиває багатофункціональну силу. Не лише естетичну. Реальну силу для повсякденного життя.
«Стабільність – це не просто нерухомість. Це контроль руху у просторі».
Ця вправа стирає межу між базовою роботою для м’язів кора та просунутою ротаційною потужністю. Якщо ви хочете покращити поставу, це допоможе. Якщо хочете сильніші руки без жиму лежачи, це допоможе. Це непомітно. Але ефективно.
Як виконувати правильно
Встаньте на бік. Стопи мають стояти один на одному. Покладіть передпліччя на підлогу, лікоть повинен бути прямо під плечем. Підніміть таз так, щоб тіло утворило пряму лінію від голови до п’ят.
Напружте м’язи кора. Не дозволяйте тазу провисати. Це найпоширеніша помилка. Коли таз опускається, навантаження лягає на поперек. Бережіть хребет. Тримайте лінію твердою.
Витягніть верхню руку. Натисніть на небо. Стисніть трицепс. Затримайтеся на секунду. Потім опустіть руку із контролем.
Повторіть з іншого боку. Баланс має ключове значення. Якщо одна сторона слабша, ви це помітите. Це добре. Це нагадує, на чому потрібно зосередитися.
Поширені помилки, яких слід уникати
- Провисання таза: Це зводить нанівець користь для м’язів кора. Вправа перетворюється на навантаження на плече. Тримайте таз піднятим.
- Знизування плечима: Не дозволяйте верхньому плечу підніматися до вуха. Тримайте його опущеним та відведеним назад.
- Поспіх з повтореннями: Швидкість вбиває техніку. Уповільніться. Відчуйте роботу м’яза.
Якщо ви відчуваєте біль у плечі, зупиніться. Скоригуйте положення руки. Можливо, ваш лікоть знаходиться надто далеко вперед. Знайдіть оптимальне становище.
Інтеграція у вашу тренувальну програму
Де це вписується? У будь-якому місці.
Ви можете додати його до кінця тренування. Завершуйте її потужно. Або використовуйте його як вправу для активного відновлення. Воно має низьке ударне навантаження, але високу м’язову напругу.
Поєднуйте його з іншими вправами для кору. Змішуйте із планками. Контрастуйте з динамічними рухами, такими як берпі. Різноманітність змушує організм адаптуватись. А прогрес відбувається саме у процесі адаптації.
Перегляньте ці ресурси для додаткової інформації:
- програма тренувань для всього тіла
- Силові тренування для жінок
- Розминальні вправи
- Вправи для преса
- Вправи для рук, грудей та
Чому ця вправа працює на стабільність і силу
Стандартні планки розвивають витривалість м’язів кора, але при цьому трицепси залишаються дуже пасивними. Додавання розгинання трицепса повністю змінює динаміку. Ви більше не просто утримуєте статичне становище; ви активно вмикаєте задній ланцюг верхньої частини руки, одночасно стабілізуючи все тіло проти сили тяжіння.
Це поєднання вирішує два різні завдання: локальну м’язову витривалість трицепсів та глобальну стабільність кора. Бічна планка вимагає значного активування косих м’язів живота та сідничних м’язів, щоб стегна не провисали. Коли ви додаєте витяг руки догори, ви створюєте завдання на опір обертанню. Вашій корі доводиться працювати інтенсивніше, щоб запобігти скручуванню тулуба під вагою витягнутої руки.
Як виконувати бічну планку з розгинанням трицепса
Техніка тут не підлягає обговоренню. Поспіх у виконанні руху чи провисання стегон перенесуть навантаження з цільових м’язів на поперек чи плечі.
1. Вихідне становище на боці
Ляжте на правий бік. Спиратися потрібно на правое передпліччя. Лікоть повинен бути строго під плечовим суглобом, не надто далеко попереду або ззаду. Стопи поставте одну на іншу. Якщо вам важко тримати рівновагу, трохи розведіть стопи для більш широкої бази опори.
2. Підйом у планку
Напружте косі м’язи живота та сідниці, щоб підняти стегна від підлоги. Тіло має утворювати пряму діагональну лінію від голови до щиколоток. Не дозволяйте стегнам провисати до підлоги або надто сильно підніматися до стелі. Це нейтральне становище хребта є ключовим.
3. Закріплення становища
Утримуйте базову позицію бічної планки протягом усього підходу. Не допускайте “схлопування” корпусу. Якщо ви відчуваєте, що стегна опускаються, перевірте встановлення стоп або зменшіть амплітуду руху на наступному кроці. Стабільність має передувати розгинанню.
4. Виконання розгинання трицепса
Закріпивши праву руку, витягніть ліву руку прямо вгору до стелі. Якщо у вас є проблеми з імпінджмент-синдромом плеча, тримайте лікоть трохи зігнутим, але для більшості людей метою є пряма рука. Це стартова позиція для розгинання.
5. Опускання та підйом
Повільно опустіть ліву руку за голову, згинаючи лікоть. Уявіть, що ви намагаєтеся торкнутися лівого ліктя правим ліктем. Потім поверніться у вихідне положення. Це одне повторення.
Ключові вказівки для максимальної користі
- Тримайте повільний темп. Інерція вбиває користь вправи. Підйом протягом 2 секунд та опускання протягом 2 секунд гарантує, що роботу виконують трицепси, а не інерція.
- Дихайте. Видихайте, коли витягуєте руку вгору. Вдихайте, коли опускаєте її. Не затримуйте дихання.
- Погляд. Дивіться на підлогу між руками або трохи вперед. Погляд нагору може напружити шию.
- Здоров’я плечей. Тримайте плече, що працює, опущеним і відведеним назад. Не дозволяйте йому підніматися до вуха.
Модифікації та прогресії
Занадто важко?
* Ноги зігнуті: Опирайтеся на коліна замість стоп. Це зменшує довжину важеля та полегшує підтримку вирівнювання стегон.
* Статичне утримання: Пропустіть розгинання. Просто утримуйте бічну планку в заданий час.
Занадто легко?
* Підйом ноги: Коли ви витягуєте руку, підніміть верхню ногу.
Зафіксуйте лікоть
Повністю випряміть руку. У верхній точці руху зосередьтеся скорочення трицепса. Саме тут відбувається основна робота. Не дозволяйте вазі просто висіти на суглобі. Випряміть лікоть, але не клацайте ним. Затримайтеся на секунду. Відчуйте напругу.
Повертайтесь повільно
Зігніть лікоть. Опускайте вагу під контролем. Не дозволяйте силі тяжкості виконувати роботу за вас. Рух має бути плавним. Поверніться у вихідне положення. Зробіть паузу. Видихніть. Потім повторіть.
Додаткові способи розвитку сили
Якщо ви хочете розширити свою тренувальну програму, вийшовши за рамки цієї однієї вправи, наступні цільові посібники допоможуть вам сформувати гармонійну статуру:
- Тренування для всього тіла : Кругові тренування для розвитку загальної сили.
- Силові тренування для жінок : Техніки адаптовані під жіночу фізіологію.
- Розминка : Динамічна розтяжка для запобігання травмам перед початком силових вправ.
- Вправи для преса : Стабілізація кора для покращення техніки виконання вправ.
- Вправи для рук, грудей та плечей : Базові рухи для набору маси верхньої частини тіла.
- Розтяжка : Відновлення після тренування для підтримки гнучкості.
Про автора
Цей матеріал підготовлений за участю Лотті Олсон, сертифікованого національного персонального тренера з десятирічним досвідом роботи в цій сфері. Вона має ступінь бакалавра за спеціальністю «Наука про фізичні вправи та управління фітнесом» від Університету Вісконсін-Ошкosh. Її досвід поєднує академічні знання з практичною тренерською майстерністю, що гарантує, що рекомендації засновані як на теорії, так і на реальному досвіді застосування.